


At the Google Ventures Design Studio, we have a five-day process for taking a product or feature from design through prototyping and testing. We call it a product design sprint. This is the sixth in a series of seven posts on running your own design sprint.
On day 2 you drew concept sketches. On day 3, you made a plan and a storyboard for your prototype. Now it’s day 4, and the clock is ticking. You’re going to create a real-looking version of yesterday’s storyboard and show it to users tomorrow.
This part of the sprint is super exciting for me as a designer. Thanks to the storyboard, I know exactly what to do, and I also have a crazy deadline to get it done. It’s finally time to to open my laptop, put on my headphones, and start moving pixels.
But wait a second…what should this prototype look like? Are we going to have to code anything?
WHAT YOUR PROTOTYPE SHOULD LOOK LIKE
Quite simply, a prototype is anything a person can look at and respond to. A prototype doesn’t usually have to be very complex in order to learn what you need to know.
Make it minimally real
You’ll probably be amazed at how much real feedback a user can give you on a slide deck of mockups that aren’t even pixel-perfect.
They can tell you what they understand about your product—and what they don’t. They’ll tell you what they expect things to do (“I’d click here because I’d want to see a list of your customers…”), and when they get confused.
You’ll also learn things that metrics alone can’t tell you, in particular why users do the things they do, rather than just what they do. And you’ll learn much faster than if you had waited to build something.
Write real text
While it can be tempting to use “lorem ipsum” when you’re building a quick prototype, don’t do it—always write real text for your prototype.
Trending: 5 Reasons Life Gets Better After Your 40s
Why? First, user interfaces are mostly text. Punting on the text might save you time, but it won’t get you closer to solving your problem. Plus, in design sprints we’re often figuring out how to explain things and testing whether users understand. Lorem ipsum skips all of that. When you use dummy text, you avoid tough decisions and limit how much you can learn. (37signals has a great essay on using real words in their book Getting Real.)
Keynote versus code
Occasionally you’ll need to write some code for your prototype. This can be really valuable when you’re testing assumptions relating to data quality or personal content like email. But nine times out of ten we find that Keynote is sufficient. More on this later.
Here are some examples
We have created dozens of minimally real prototypes for the startups in our portfolio. Here are a few examples, covering the spectrum from grayscale and low-fidelity to nearly pixel-perfect.
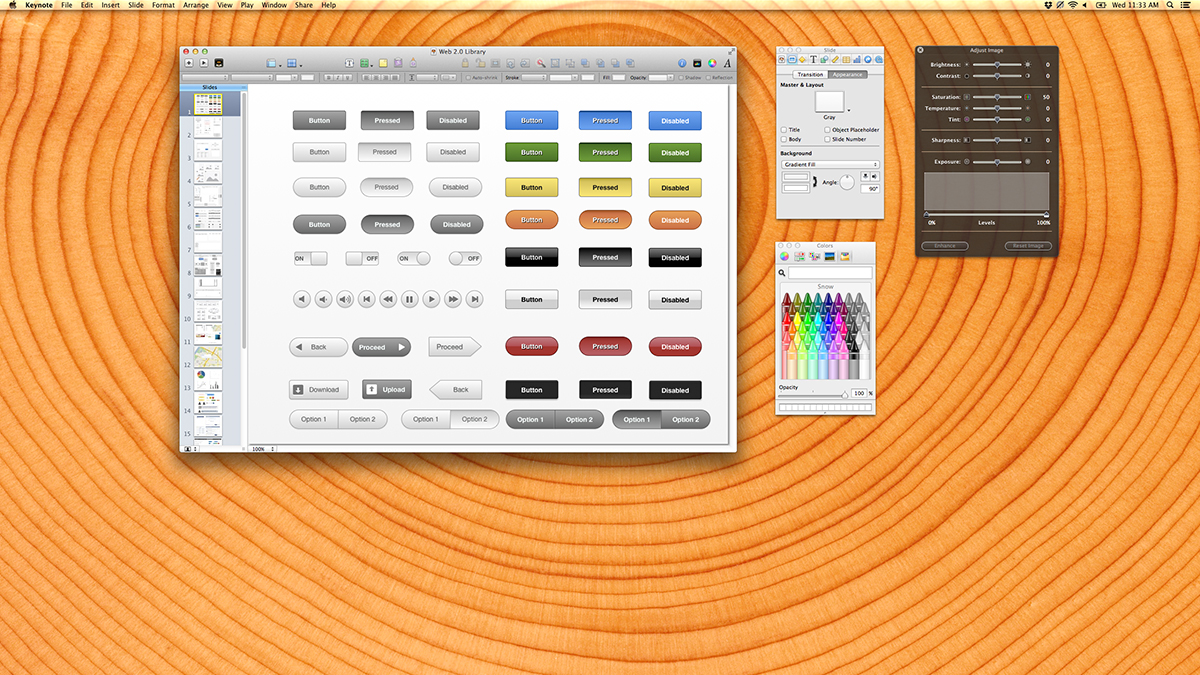
KEYNOTE IS THE WORLD’S BEST PROTOTYPING TOOL
If you’re building a product for desktop, mobile, or iPad, the fastest and easiest prototyping tool you can use is Keynote. I’ve spent my career working with fancy tools like Photoshop and Illustrator and Fireworks. (OK, Fireworks might not be fancy, but it’s almost certainly a tool.)
Here’s why Keynote wins for prototyping:
• It’s fast.
• It’s easy to make things look pretty good…
• But it’s impossible to make things look perfect, so you don’t get too precious.
• Anybody can quickly learn to use it; not just designers.
• The slideshow format is a natural fit for story-based design.
• It costs only $20.
• The animated transitions are a lightning-fast way to make your prototype look way more real than it really is.
• If it’s a mobile prototype, you can export a PDF and open it on your device with reasonable results.
When you’re done, you not only have a prototype, you have a presentation, like, for free!
• After your user study, when you learn all of the problems in your design, it’ll take minutes to make changes instead of hours or days.
(“Wait,” you say, “I use a PC.” Wow, you just blew my mind. Almost everybody I meet who works at a startup has a Mac, but true, there are exceptions. If I stereotyped you, I am deeply sorry. Let me make it up to you by pointing you to Henry Tsai’s excellent post on building PowerPoint prototypes.)
The final Keynote (or PowerPoint) prototype might be linear or it might have a few links that allow the user to click around. It might be a grayscale wireframe or it might be somewhat polished. Either way, these make for good prototypes. They’re going to be realistic enough that your user study participants will forget they aren’t clicking on a real product.
Keynotopia templates make it even faster
Here’s our favorite secret prototyping weapon: Keynotopia. It’s a template with buttons, menus, and all kinds of plug-and-play elements that you can just drop into your prototype without any design skills at all. This makes it easier for CEOs and marketing directors to dive in and make something to communicate what they’re thinking. And it’s available for PowerPoint too, if that’s how you roll.
All right already, I bought Keynote, now what?
You made a wise choice, my friend, and the prototypes are going to start flowing like milk and honey.
WHAT TO DO IN DAY 4
Here’s a rough schedule for your day of prototyping. Expect to spend about an hour in the morning to review and make your plan.
Divide and conquer
What if you have too much to design and not enough time? Work together, baby.

Take a look at your team. How many people can help in Keynote? Chances are good that almost everyone can—in our sprints, we frequently have engineers, PMs, and CEOs cranking out good work in Keynote. Remember that everybody’s work doesn’t have to be genius level. A designer can always clean it up afterwards, but it’s usually faster to clean up a slide after someone else has put the building blocks in place.
Now take a look at yesterday’s storyboard—or, if you’re doing a “battle royale,” storyboards plural. Break it into chunks and assign them out. It’s probably obvious, but it’s helpful to think about where different people have expertise, or where it’s best to spend your designer’s time, or who moves the fastest.
You probably want to divvy up the best of the storyboard sketches on paper, too. Those are often the blueprint for many of the mockups you’ll have to make, and they can save you a bunch of time.
Assign one person to be the stitcher. The stitcher’s job is to take everybody else’s work and put it into one cohesive flow. If you only have one designer, or if one person is really fast at Keynote, she might be a good candidate. If you’re doing a “battle royale,” you may decide to have one stitcher for each competing version.
Breaking up the design work and stitching it back together probably doesn’t sound like the way great design is done. And it’s not. Realistically you’ll get better results if you’ve focused enough that your designers can do all the work here. But if you need it, dividing and conquering is an incredibly fast way to build a good-enough-to-learn-from prototype.
Build an asset library
Another way to increase efficiency is to take a few moments at the beginning of the day to build a template slide deck. Include anything that everyone will need—screenshots, user avatars, logos, formatted text; whatever you think might help. And don’t forget to include a browser bar at the top for realism. You don’t want to go through 99 slides at the end, scooting each one down to make room.
Use a timer to maintain focus
Once again, the Time Timer is your friend—although if you don’t have one, I guess some other kind of clock might work. We’ll often say something like: “Let’s work heads-down for the next hour and then we’ll take a break.” Time-boxing can make the project feel less daunting, and reduce the impulse to check your email and burn up valuable make time.
Appoint an email sheriff
It’s sometimes helpful to appoint someone—usually the facilitator—as the “email sheriff.” This person’s job is to publicly shame anyone who is checking their email (or surfing the web or whatever time-wasting tactic you prefer). It’s usually enough to just make a big deal about saying that someone is going to do this…the threat alone practically makes the job unnecessary.
Lightning critique
If you have a bunch of people working in parallel, it might be helpful to do a quick critique midday. It’s useful to ensure consistency and get outside eyes on your design. But critiques can eat up a lot of time if you aren’t careful. Just like on day 2, you’re going to want to limit the time spent talking about each design. I recommend 5 minutes.
You’re also going to want to prevent people from trying to redesign somebody else’s work—they might have a great idea, but there just isn’t time in this part of the sprint. Instead, use the lightning critique as an opportunity to raise questions and criticisms, but make it clear that the person who designed those components is going to be responsible for figuring out the solution, not the group.
Review with an outsider
Schedule 30 minutes with someone who is not doing design work today. It might be your user researcher if you’re lucky enough to have one, or it might be an executive—seems like everybody’s got one or two of those hanging around. The outside eyes will help prevent you from going too far down any groupthink rabbit holes. Just make sure to do this early enough in the day that you have plenty of time to respond to the feedback afterward!
Pointers, text, and other final touches
If you’re creating a linear prototype with no links, which is the very fastest thing to do, it’s a good idea to draw a mouse pointer and add extra slides showing where the user would click, and extra slides when text is entered. It takes only a little extra time but makes the user study much more realistic.
Trending: 40 Nonfiction Books to Look Out for in 2024
Other crucial details:
Check for consistency and typos, especially if you’ve got some made up user data. Don’t let it start out as Sally and end up as Suzy. That stuff is distracting in a user study.
Try to make any content current and relevant. If you’re running the study in Seattle, and you need to show a newspaper, show the Seattle Times, not theMilwaukee Journal Sentinel.
If you get stuck, remember what you’re trying to learn—don’t waste 30 minutes tweaking a button style if you’re doing a study about whether people understand the value proposition.
WHEN KEYNOTE ISN’T ENOUGH
Nine times out of ten, you can learn everything you need to know in a user study with a click-through of mockups.
But sometimes you can’t avoid it. When you’re testing big assumptions involving data quality, or when users need to interact with their own stuff (email, docs, contacts, etc) to really understand the product, there’s no substitute for a code prototype. In this case, get someone with engineering chops to help.
Just make sure everybody, especially the engineer, knows that this code will be throwaway. That’s really important: The. Code. Is. THROWAWAY. We gotta move fast, so don’t get attached. Like the Keynote prototype, it just has to look sort of real, it doesn’t have to be anywhere near perfect.
IT’S OK IF YOU’RE NOT SATISFIED, MICHELANGELO
It’s better to be done with something good enough than to be half-finished with a masterpiece. Remember that the goal is to learn from the user study tomorrow, not to have everything perfectly figured out and finished.
Stay tuned for the next—and final!—installment of the series.
And in the meantime, what tricks do you use for super rapid prototyping? Do you have a tool that you swear is better than Keynote? I’d love to argue with you about it (respectfully, of course) in the comments!
This post originally appeared on Fast Company.